dtable-db Standalone
To improve scalability and reliability, the next step is to move dtable-db to its own dedicated node.
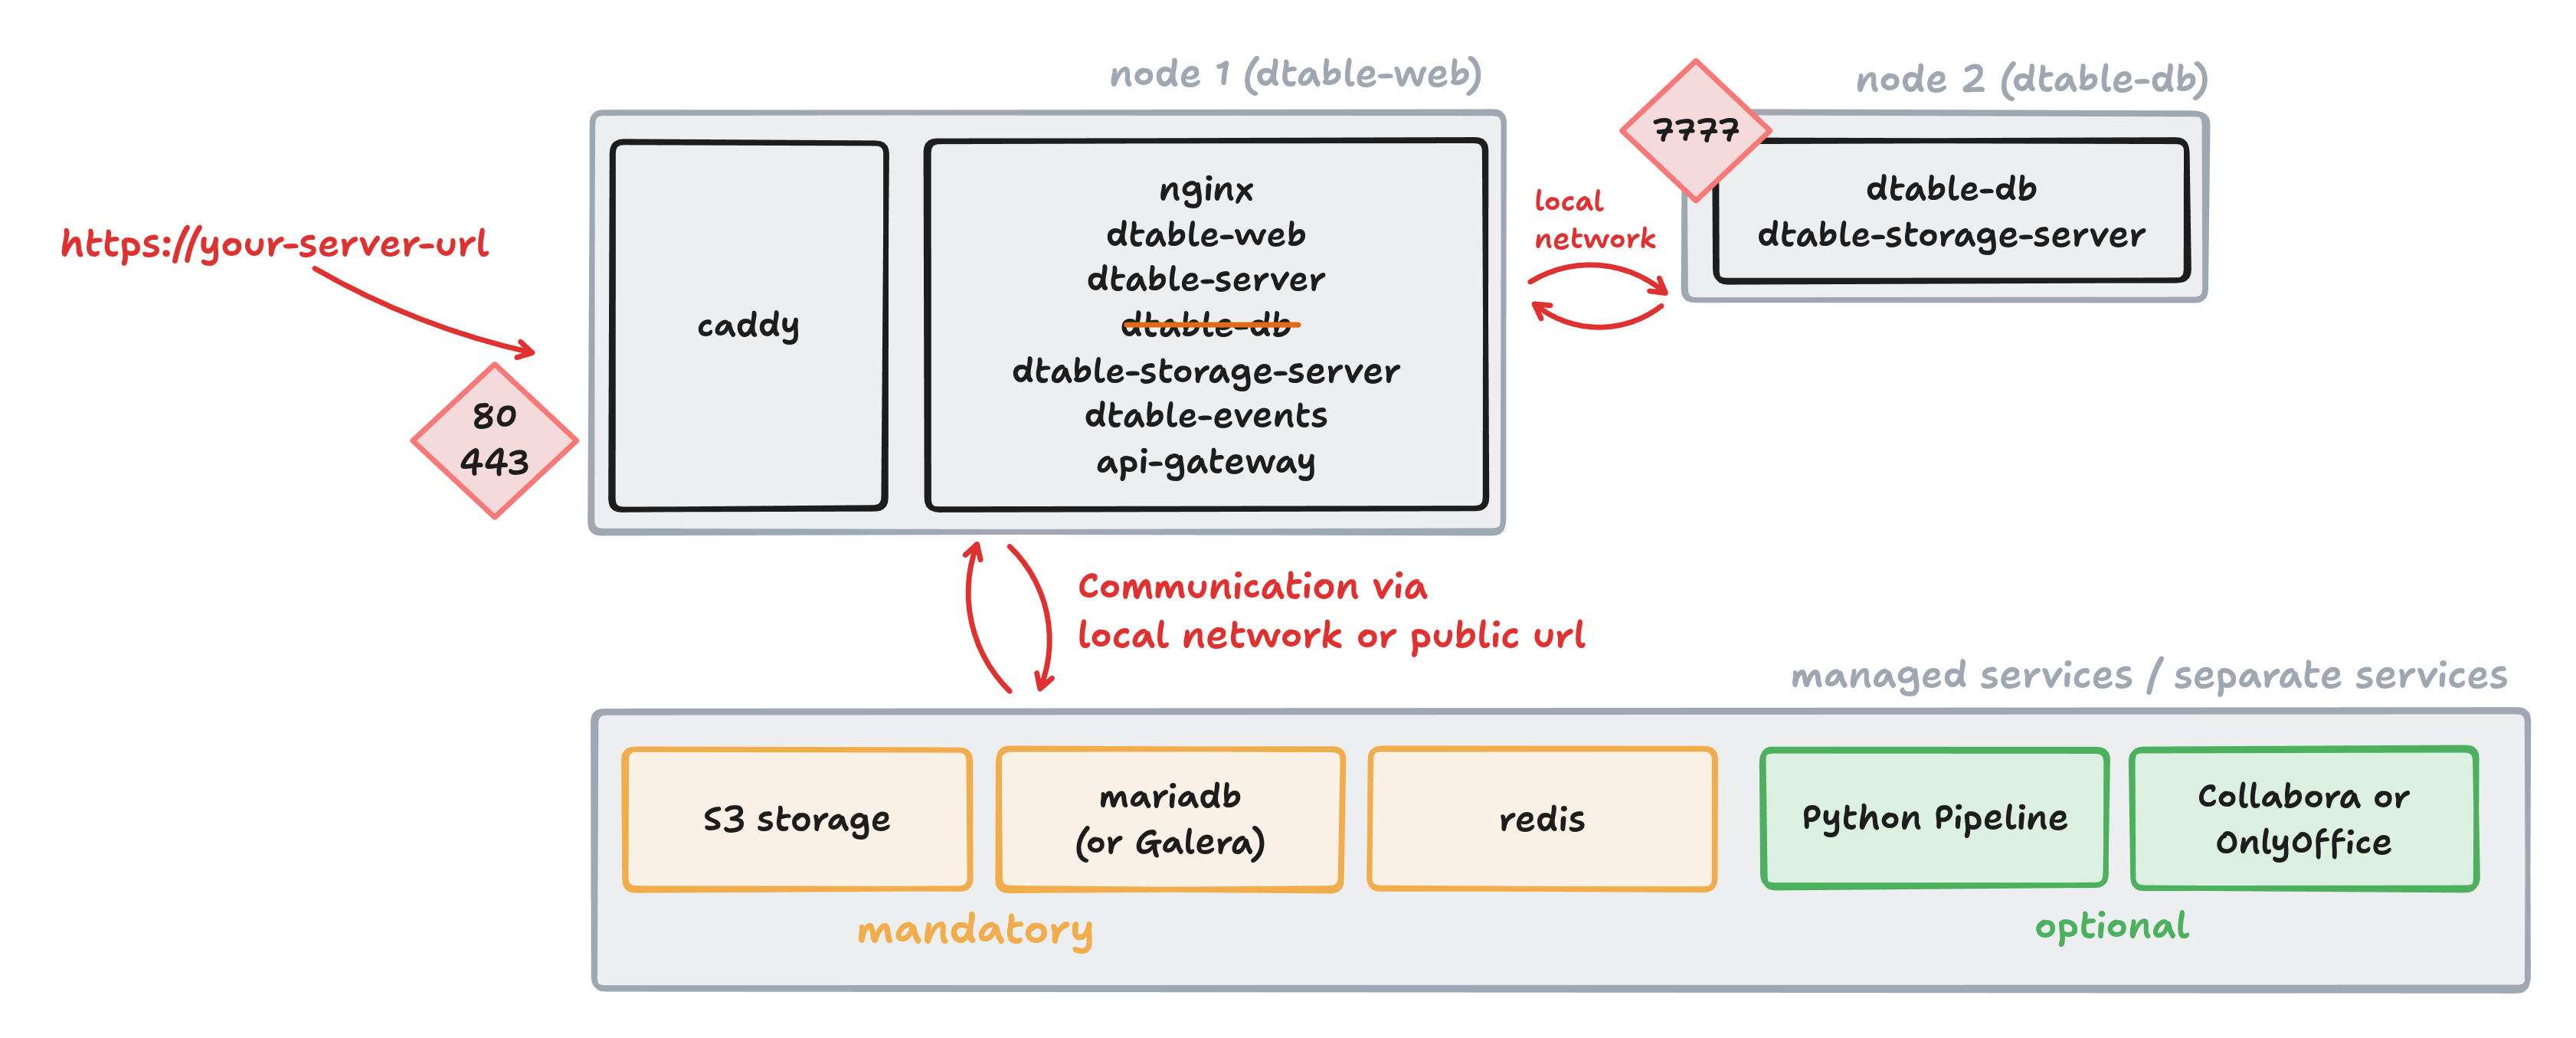
Setting Up a Standalone dtable-db Server
Prepare a new node with Docker installed, and copy the following files from your first node to this new node:
/opt/seatable-compose/.env/opt/seatable-compose/seatable-license.txt
Open the .env file on the new node and ensure that the COMPOSE_FILE variable references only a single YAML file, like this:
COMPOSE_FILE='dtable-db.yml'
Create dtable-db.yml
Now, create the dtable-db.yml file. You can either copy dtable-web.yml from the first node or use seatable-server.yml from the SeaTable release as a template.
Apply the following required changes to this file:
Remove all services except seatable-server
The dtable-db node only requires the seatable-server service. Remove all other services (such as redis, mariadb, or caddy).
Remove all labels
Since dtable-db node does not require Caddy or any TLS termination, remove all labels from the seatable-server service.
Add additional environment variables
Add or update the following environment variables to ensure only dtable-db is enabled:
environment:
  #... all default environment variables in seatable-server.yml ...
  # this node should only run dtable-db, all other services are disabled
  - ENABLE_DTABLE_DB=true                # that is, what we want
  - ENABLE_DTABLE_STORAGE_SERVER=true    # required for big data backup
  - ENABLE_SEAFILE_SERVER=false
  - ENABLE_DTABLE_WEB=false
  - ENABLE_DTABLE_SERVER=false
  - ENABLE_DTABLE_EVENTS=false
  - ENABLE_API_GATEWAY=false
  - SEATABLE_START_MODE=cluster          # Don't run any database update processes
Expose port 7777
The dtable-db node must be accessible to other nodes. Add the following to the seatable-server service:
ports:
  - 7777:7777
Configure internal network communication
Node-to-node communication uses the internal network. Ensure all nodes can reach each other by adding their names and private IP addresses:
extra_hosts:
  - "dtable-web:10.0.0.2"
  - "dtable-db:10.0.0.3"
For reference, here is an example of what your dtable-db.yml might look like (do not copy and paste directly — adapt as needed):
---
services:
  seatable-server:
    image: ${SEATABLE_IMAGE:-seatable/seatable-enterprise:x.x.x}
    restart: unless-stopped
    container_name: seatable-server
    volumes:
      - "/opt/seatable-server:/shared"
      - type: bind
        source: "./seatable-license.txt"
        target: "/shared/seatable/seatable-license.txt"
        read_only: ${SEATABLE_LICENSE_FORCE_READ_ONLY:-false}
    environment:
      ...
      ...
      # this node should only run dtable-db
      - ENABLE_DTABLE_DB=true
      - ENABLE_DTABLE_STORAGE_SERVER=true
      - ENABLE_SEAFILE_SERVER=false
      - ENABLE_DTABLE_WEB=false
      - ENABLE_DTABLE_SERVER=false
      - ENABLE_DTABLE_EVENTS=false
      - ENABLE_API_GATEWAY=false
      - SEATABLE_START_MODE=cluster
    ports:
      - 7777:7777
    extra_hosts:
      - "dtable-web:10.0.0.2"
      - "dtable-db:10.0.0.3"
    networks:
      - frontend-net
networks:
  frontend-net:
    name: frontend-net
Now, start dtable-db for the first time and monitor the logs:
docker compose up -d
Changes after first start
After the first start of dtable-db you need to make the following changes to newly created configuration files:
Add S3 configuration
Add the S3 configuration to conf/dtable-storage-server.conf - analog to your first node.
Two additional configuration changes
Open conf/dtable-db.conf and make these two changes:
- set
hostto 0.0.0.0 that other nodes can reach dtable-db. - add
[dtable cache]to telldtable-dbwhere to finddtable-server.
[general]
host = 0.0.0.0

[dtable cache]
dtable_server_url = "http://dtable-web:5000"
Verify installation on dtable-db
Now it is time to restart dtable-db and verify that the service is running and port 7777 is exposed. Simply run:
curl 127.0.0.1:7777/ping/
You should receive the following response:
{"ret":"pong"}
Configure dtable-web to use the standalone dtable-db
Now that dtable-db is up and running, it is time to tell dtable-web to use this separate node instead of the internal component. These are the changes, you have to do.
Disable dtable-db in .env
Open /opt/seatable-compose/dtable-web.yml and make these changes:
environment:
  - ENABLE_DTABLE_DB=false
extra_hosts:
  - "dtable-web:10.0.0.2"
  - "dtable-db:10.0.0.3"
ports:
  - "5000:5000"
Create configuration file for the API-Gateway
Create a new configuration file conf/dtable-api-gateway.conf and add these lines to tell this node, where to find dtable-db
[dtable-db]
server_address = "http://dtable-db:7777"
Update dtable_web_settings.py
Open the configuration file /conf/dtable_web_settings.py and add this line:
INNER_DTABLE_DB_URL = 'http://dtable-db:7777/'
Update dtable_server_config.json
Open the configuration file conf/dtable_server_config.json and add this line. Make sure, that it is valid json, meaning the last key-value pair, does not have a comma at the end.
"dtable_db_service_url": "http://dtable-db:7777"
Restart dtable-web server
docker compose up -d
Verify complete setup
A good way to verify, that the two nodes are working fine, is to ppen a universal app in the webinterface. You should see log entries on dtable-db in /logs/dtable-db-access.log.
Congratulations. dtable-db is now standalone.