Installation multiple dtable-servers
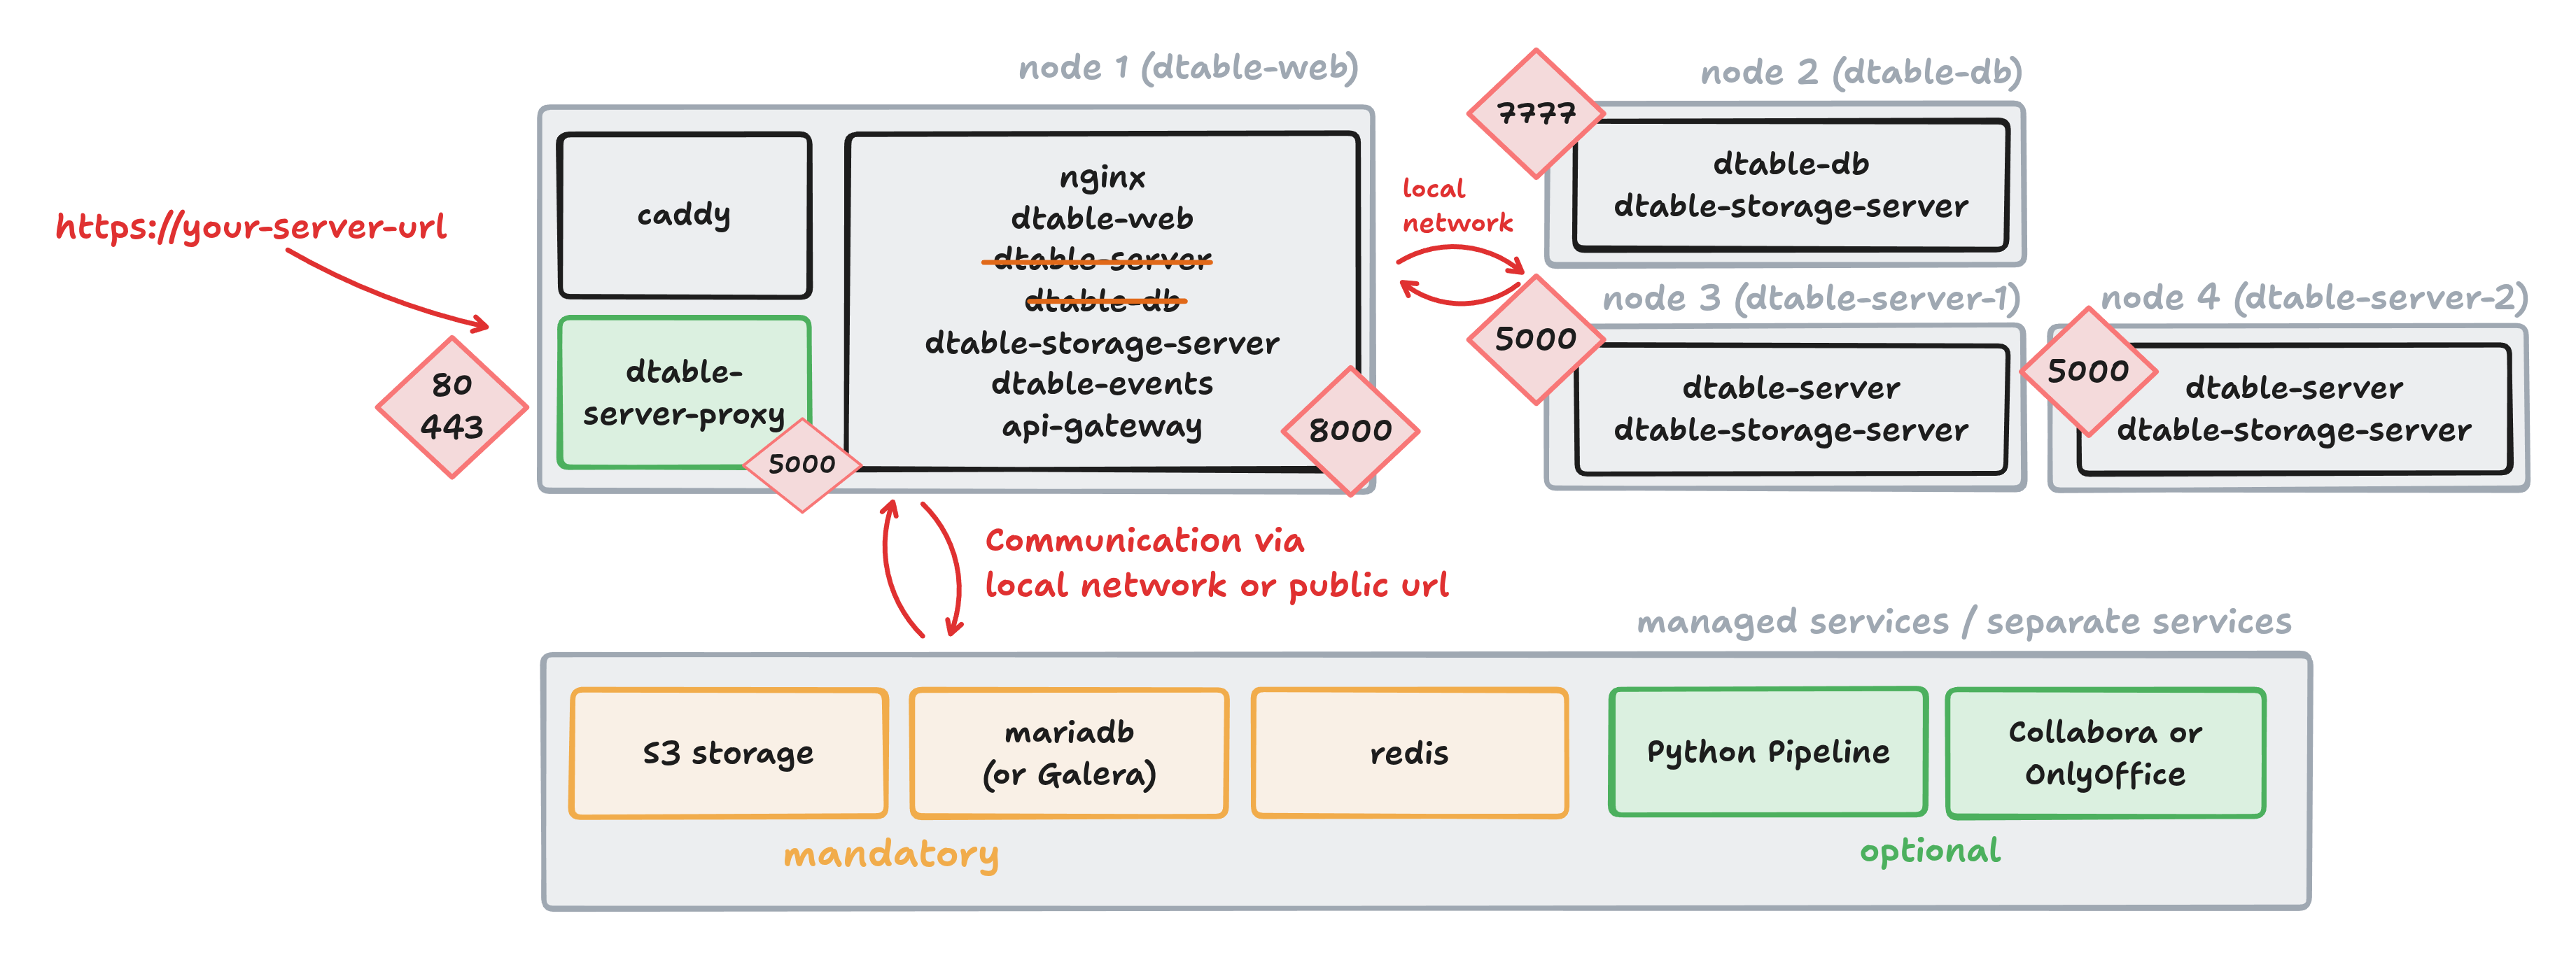
As your system grows, the dtable-server often becomes the first bottleneck. To address this, you can scale dtable-server horizontally. This guide explains how to set up multiple dtable-servers and configure a proxy on the dtable-web node to distribute base requests between them.

Routing logic with multiple dtable-servers
Proper routing logic is essential when running multiple dtable-servers. While seatable-server itself is stateless, it is crucial that all users open a specific base on the same dtable-server.
- When a base is opened, dtable-server loads it into memory and only writes updates to disk every five minutes.
- If the same base is opened on two different dtable-servers, their changes can overwrite each other — this must be avoided.
To ensure consistency, implement a fixed mapping of bases to dtable-servers using the base_uuid. This ensures each base is always handled by the same server. This setup is not a failover solution, but it scales horizontally and can support thousands or even tens of thousands of users.
Example mapping logic:
- Bases starting with
0-9: handled by the first dtable-server. - Bases starting with
a-f: handled by the second dtable-server.
Setting up a of second dtable-server
-
Install a second dtable-server as described in the dtable-server (standalone) section. Name it
dtable-server-2. -
Update the private network configuration: Add the IP address of the new server to the
extra_hostssection on all nodes.extra_hosts: - "dtable-web:10.0.0.2" - "dtable-db:10.0.0.3" - "dtable-server:10.0.0.4" - "dtable-server-2:10.0.0.5 -
Verify that
dtable-server-2is accessible on port 5000.
Adding a Proxy to Distribute Requests
To route requests to the correct dtable-server, add a proxy component (using nginx), called dtable-server-proxy. Deploy this on the dtable-web node.
Create the Proxy Service
Create /opt/seatable-compose/dtable-server-proxy.yml on dtable-web:
---
services:
dtable-server-proxy:
image: nginx:1.27.5-alpine
container_name: dtable-server-proxy
ports:
- "5000:5000"
volumes:
- ./nginx-proxy.conf:/etc/nginx/nginx.conf:ro
networks:
- frontend-net
  extra_hosts:
    - "dtable-web:10.0.0.2"
    - "dtable-db:10.0.0.3"
    - "dtable-server:10.0.0.4"
    - "dtable-server-2:10.0.0.5
logging:
driver: json-file
options:
# Maximum size per file
max-size: 10m
# Maximum number of files
max-file: 3
networks:
frontend-net:
name: frontend-net
Configure nginx Routing
Create /opt/seatable-compose/nginx-proxy.conf on dtable-web. This configuration defines two upstream servers and a routing map:
worker_processes auto;

events {
  worker_connections 4096;
}

http {
  access_log off;
  error_log /dev/stdout warn;

  # dtable-server 1
  upstream dtable_server_a_z {
    server dtable-server:5000;
    keepalive 15;
  }

  # dtable-server 2
  upstream dtable_server_0_9 {
    server dtable-server-2:5000;
    keepalive 15;
  }

  # Map to dynamically determine the upstream server based on the UUID in the URL
  map $request_uri $dtable_upstream {
    default                                  dtable_server_a_z;    # Default to the a-z server
    "~*ff84e1a1-66e2"                        dtable_server_0_9;    # force this base to server 2
    "~*([a-zA-Z])([0-9a-f]{7}-[0-9a-f]{4})"  dtable_server_a_z;
    "~*([0-9])([0-9a-f]{7}-[0-9a-f]{4})"     dtable_server_0_9;
  }

server {
  server_name _;
  listen 5000;

  location / {
    proxy_pass http://$dtable_upstream;
    proxy_set_header X-Upstream-Server $dtable_upstream;
    client_max_body_size 100m;
    proxy_http_version 1.1;
    proxy_set_header Upgrade $http_upgrade;
    proxy_set_header Connection upgrade;
    access_log /tmp/access.log;
    error_log /tmp/error.log;
  }
}
}
You can adapt the routing logic as needed, for example by splitting bases differently or forcing specific base_uuids to a particular server.
Required Configuration Changes
Start dtable-server-proxy
Add dtable-server-proxy.yml to your .env by including it in the COMPOSE_FILE variable. This ensures the proxy container starts.
Allow direct access to dtable-web
Edit conf/gunicorn.py and update the bind address:
bind = '0.0.0.0:8000'
Update INNER_DTABLE_SERVER
Edit conf/dtable_web_settings.py and set:
INNER_DTABLE_SERVER = 'http://dtable-web:5000/'
Update Ping endpoints
Edit /opt/seatable-compose/config/seatable-nginx.conf to update ping endpoints:
# ping endpoints
location = /dtable-server/ping/ {
    proxy_pass http://dtable-web:5000/ping/;
}
location = /dtable-db/ping/ {
    proxy_pass http://dtable-db:7777/ping/;
}
Restart all containers on dtable-web to apply the changes.
Updates on dtable-db
Since the routing logic has changed, update dtable-db so it always uses the proxy instead of contacting dtable-server directly.
Use dtable-server-proxy on dtable-db
Edit conf/dtable-db and set:
[dtable cache]
dtable_server_url = "http://dtable-web:5000"
Unload all bases on dtable-servers
To ensure no bases remain in memory on the dtable-servers, restart both servers. This prevents issues with parallel saving of bases.
Unloading is crucial
Any time you modify the proxy logic in your nginx configuration, you must restart all dtable-servers. Since dtable-server can keep bases in memory for up to 24 hours, failing to restart may result in data loss or inconsistencies.
Verify your setup
Use the following tests to confirm your configuration:
| Where to execute | Test | Expected result |
|---|---|---|
| dtable-web | curl http://127.0.0.1:5000/ping/ | pong |
| dtable-web | curl http://127.0.0.1:8000/api2/ping/ | pong |
| Browser | Open a base with base_uuid starting a-z | Log entries on dtable-server |
| Browser | Open a base with base_uuid starting 0-9 | Log entries on dtable-server-2 |
| Browser | Open a universal app | Log entries on dtable-db |
Final thoughts
Congratulations! Your setup now uses two dtable-servers, laying the foundation for even greater scalability. To add additional dtable-servers, repeat these steps:
- Set up another dtable-server.
- Add the new upstream to
nginx.conf(dtable-server-proxy). - Restart all dtable-servers to clear their memory.